Engineers are available to assist.

| Title | Compare | Stock Number | Price | Buy | |
|---|---|---|---|---|---|
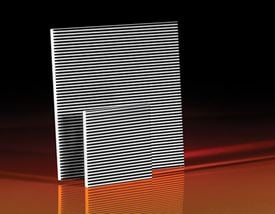
| 1" x 1", 25 lp/inch, Opal Glass Ronchi Ruling | #59-497 | €98,00 Qty 5+ €93,90 Request Quote |
|
||
| 1" x 1", 50 lp/inch, Opal Glass Ronchi Ruling | #59-498 | €104,00 Qty 5+ €99,90 Request Quote |
|
||
| 1" x 1", 100 lp/inch, Opal Glass Ronchi Ruling | #59-499 | €110,00 Qty 5+ €104,80 Request Quote |
|
||
| 1" x 1", 150 lp/inch, Opal Glass Ronchi Ruling | #59-500 | €119,00 Qty 5+ €113,70 Request Quote |
|
||
| 1" x 1", 200 lp/inch, Opal Glass Ronchi Ruling | #59-501 | €130,00 Qty 5+ €123,70 Request Quote |
|
||
| 1" x 1", 250 lp/inch, Opal Glass Ronchi Ruling | #59-502 | €144,00 Qty 5+ €137,70 Request Quote |
|
||
| 1" x 1", 300 lp/inch, Opal Glass Ronchi Ruling | #59-503 | €156,00 Qty 5+ €148,70 Request Quote |
|
||
| 1" x 1", 500 lp/inch, Opal Glass Ronchi Ruling | #59-504 | €183,00 Qty 5+ €174,60 Request Quote |
|
||
| 1" x 1", 750 lp/inch, Opal Glass Ronchi Ruling | #59-505 | €207,00 Qty 5+ €197,60 Request Quote |
|
||
| 1" x 1", 2000 lp/inch, Opal Glass Ronchi Ruling | #59-507 | €234,00 Qty 5+ €222,40 Request Quote |
|
||
| 2" x 2", 25 lp/inch, Opal Glass Ronchi Ruling | #59-518 | €215,00 Qty 5+ €204,50 Request Quote |
|
||
| 2" x 2", 50 lp/inch, Opal Glass Ronchi Ruling | #59-519 | €222,00 Qty 5+ €211,40 Request Quote |
|
||
| 2" x 2",, 100 lp/inch, Opal Glass Ronchi Ruling | #59-520 | €229,00 Qty 5+ €218,40 Request Quote |
|
||
| 2" x 2", 150 lp/inch, Opal Glass Ronchi Ruling | #59-521 | €240,00 Qty 5+ €228,40 Request Quote |
|
||
| 2" x 2", 200 lp/inch, Opal Glass Ronchi Ruling | #59-522 | €253,00 Qty 5+ €241,40 Request Quote |
|
||
| 1" x 1", 5 lp/mm, Opal Glass Ronchi Ruling | #59-511 | €130,00 Qty 5+ €123,70 Request Quote |
|
||
| 1" x 1", 10 lp/mm, Opal Glass Ronchi Ruling | #59-512 | €137,00 Qty 5+ €130,70 Request Quote |
|
||
| 1" x 1", 20 lp/mm, Opal Glass Ronchi Ruling | #59-513 | €150,00 Qty 5+ €142,70 Request Quote |
|
||
| 1" x 1", 40 lp/mm, Opal Glass Ronchi Ruling | #59-514 | €163,00 Qty 5+ €155,70 Request Quote |
|
||
| 1" x 1", 50 lp/mm, Opal Glass Ronchi Ruling | #59-515 | €207,00 Qty 5+ €197,60 Request Quote |
|
||
| 1" x 1", 100 lp/mm, Opal Glass Ronchi Ruling | #59-516 | €234,00 Qty 5+ €222,40 Request Quote |
|
||
| 1" x 1", 200 lp/mm, Opal Glass Ronchi Ruling | #59-517 | €375,00 Qty 5+ €357,10 Request Quote |
|
||
| 2" x 2", 5 lp/mm, Opal Glass Ronchi Ruling | #59-532 | €275,00 Qty 5+ €262,30 Request Quote |
|
||
| 2" x 2", 10 lp/mm, Opal Glass Ronchi Ruling | #59-533 | €298,00 Qty 5+ €283,30 Request Quote |
|
||
| 2" x 2", 20 lp/mm, Opal Glass Ronchi Ruling | #59-534 | €324,00 Qty 5+ €308,20 Request Quote |
|
||
| 2" x 2", 40 lp/mm, Opal Glass Ronchi Ruling | #59-535 | €362,00 Qty 5+ €344,10 Request Quote |
|
||
| 2" x 2", 50 lp/mm, Opal Glass Ronchi Ruling | #59-536 | €466,00 Qty 5+ €443,80 Request Quote |
|
||
| 2" x 2", 100 lp/mm, Opal Glass Ronchi Ruling | #59-537 | €620,00 Qty 5+ €589,30 Request Quote |
|


1-800-363-1992
or view regional numbers
QUOTE TOOL
enter stock numbers to begin
Copyright 2025 | Edmund Optics, Ltd Unit 1, Opus Avenue, Nether Poppleton, York, YO26 6BL, UK
California Consumer Privacy Acts (CCPA): Do Not Sell or Share My Personal Information
California Transparency in Supply Chains Act